Qt Creator#
This guide shows the fastest and easiest way to write applications on the iLCD Linux platform using the widely used software development suite Qt Creator. The guide will assume you are working in a native Ubuntu environment (Version 22.04.1 LTS). For those of you who are more used to working in Windows, we’ve included notes on what to keep in mind when working in Windows Subsystem for Linux (WSL2), also running an Ubuntu OS (Version 22.04.1 LTS). Where the two approaches differ, tabs let you select your version of choice.
What you need to follow along:
An empty SD card with 64GB of space
A computer running Ubuntu OR a WSL2
An Ethernet cable connected to a local network
Note
For all questions regarding Qt Creator such as installation and best practices, please refer to their documentation.
Prepare the target#
Before we set up our workstation let’s prepare the iLCD Linux HMI contained in your demo kit. The panel is delivered with a working production image stored on the eMMC. On power-up the panel will start the Wayland compositor, which allows you to easily start, stop and switch between various demo apps.
Download debug image#
For the purposes of development we will need a debug image. Since debug image files are quite large and subject to regular updates, they are provided via download links. You will always find the most up-to-date image files under Images & SDK. Simply select your panel and the debug image from the list and download it to a preferred location in your file system.
You’re ready to go.
Windows subsystem for Linux2 (WSL2) enables Windows users to work in a Linux environment which includes graphical UIs. Before working in this environment be sure to update both your version of WSL and the Linux distribution within the WSL.
Since the default configuration of WSL is rather bare you may have to be missing some libraries, such as the following:
Note
The packages listed here may not be sufficient. Please refer to Qt for a list of all required libraries.
sudo apt-get update
sudo apt-get install cmake pkg-config
sudo apt-get install mesa-utils libglu1-mesa-dev freeglut3-dev mesa-common-dev
sudo apt-get install libglew-dev libglfw3-dev libglm-dev
sudo apt-get install libao-dev libmpg123-dev
sudo apt-get install libxkbcommon-x11-0 libxcb-icccm4 libxcb-image0
sudo apt-get install libxcb-keysyms1 libxcb-render-util0 libxcb-shape0
Write image to SD Card#
Please refer to our guide Writing images to an SD Card on how to complete this step.
Energize#
Depending on your setup, unpacking and writing may take few minutes. When the process has finished remove the SD card from your workstation and place it into the iLCD Linux HMI. See SD card slot for details.
Plug in a USB-C cable or power supply cable while keeping our power guidelines and your panel’s current draw in mind. In order to boot from the SD card, hold the alternative boot (alt boot) button on the rear of the panel for a few seconds during startup.
Prepare your workstation#
In order to start writing your code you will need a workstation with an updated Linux distribution, we recommend working in Ubuntu or WSL2.
Install Qt Creator#
Go ahead and install the open-source version of QT Creator version 6.3.1. The downloader can be found under this link.
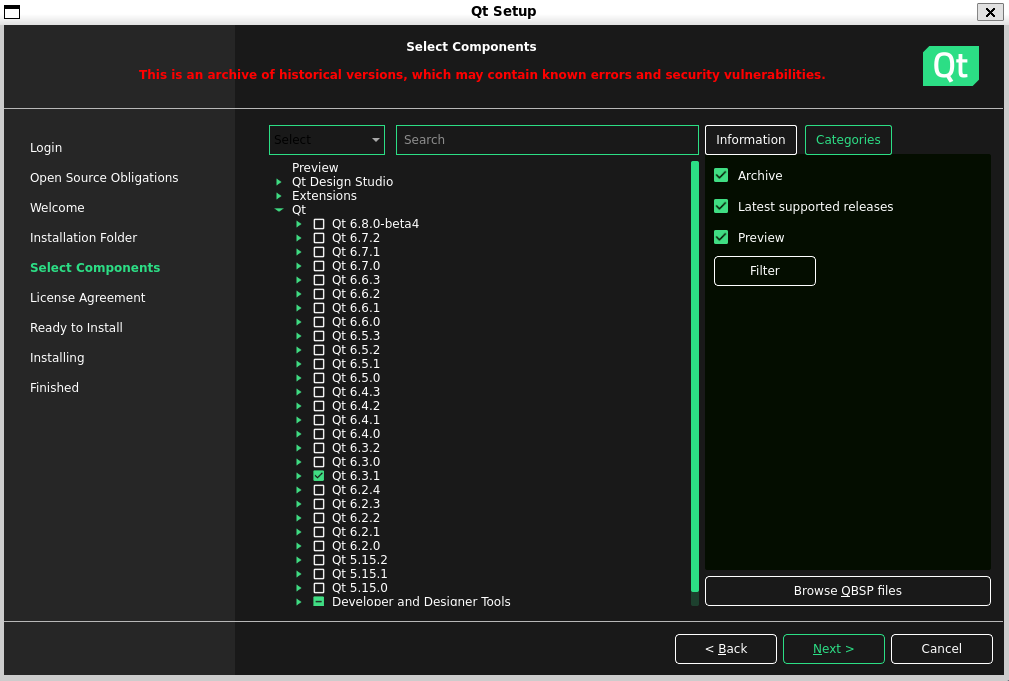
After creating an account and when prompted by the installer please select “custom installation”. Next you will see the following window.
As shown in the screenshot, please tick the “Archive” box and click “Filter”. Only then will the installer display historical versions of QtCreator. For the purposes of this tutorial please select version 6.3.1.
Download SDK#
Our SDK makes it easier and faster for developers to create software for the iLCD Linux HMIs by providing them with the necessary tools and resources tailored to our platform.
You will find the newest version of our SDK under Images & SDK.
Then open a terminal and run the following commands. The actual name of the SDK may differ from the code below, so please make sure you’re using the right version.
chmod +x fsl-imx-xwayland-glibc-x86_64-meta-toolchain-qt6-armv8a-ucm-imx8m-plus-toolchain-5.15-kirkstone.sh

./fsl-imx-xwayland-glibc-x86_64-meta-toolchain-qt6-armv8a-ucm-imx8m-plus-toolchain-5.15-kirkstone.sh
Next load the environment variables by running the following command (please ensure you’re using the correct version):
. /opt/fsl-imx-xwayland/5.15-kirkstone/environment-setup-armv8a-poky-linux
Configure the device#
To open Qt Creator, the command to do this should look something like this:
~/Qt/Tools/QtCreator/bin/qtcreator
or this:
/opt/Qt/Tools/QtCreator/bin/qtcreator
Alternatively you could create a symbolic link in the following way.
ln -s /opt/Qt/Tools/QtCreator/bin/qtcreator /usr/bin/
After this the command should work.
qtcreator
In Qt Creator open a new example project. We recommend the calculator, but it’s up to you.
Note
Please keep in mind that these projects weren’t written for our hardware, so resolution and usability may not adhere to the highest standards.
Next go to projects tab and click on “Kits” in the top left corner, go to add and apply the settings shown in the screenshot or table below.
Setting |
Value |
|---|---|
Device Type |
Generic Linux Device |
Device |
Generic Linux Device (default) |
Sysroot |
/path/to/the/sdk |
Compiler (C) |
GCC (C, arm 64bit at /path/to/the/sdk) |
Compiler (C++) |
GCC (C++, arm 64bit at /path/to/the/sdk) |
CMake Tool |
System CMake at /usr/bin/cmake |

Next we need to set the IP address of our iLCD Linux HMI. For your convenience the address can be read on the panel itself. To access this information touch the symbol and then hit info. Open the Devices tab, select your device and type the IP address you read off of your panel as in the following screenshot.

Finally click Apply and OK.
In the projects tab under environment the following variables as seen in the screenshot or table below.
Variable |
Value |
Comment |
|---|---|---|
WAYLAND_DISPLAY |
wayland-0 |
this value determines whether the app will be opened in the Wayland Compositor |
XDG_RUNTIME_DIR |
/run/user/0 |

Note
The WAYLAND_DISPLAY variable determines whether or not the example app will be opened in the wayland compositor present in the build of the development kit.
Et voilá#
Now you should be ready to code! Simply click Run and you will see the selected demo project appear on the display.